About the introduction of the back corner of the mold
When it comes to bathroom renovation, waterproofing is one of the most critical steps that should not be overlooked. Proper waterproofing ensures the safety of your home and prevents water from seeping into the floors below, which could cause damage to your property and affect your neighbors. Whether you're doing a complete bathroom overhaul or just a minor update, implementing a reliable waterproofing system is essential for long-term durability and peace of mind.
Because of the unique structure and high moisture levels in bathrooms, the waterproofing process requires careful planning and execution. From selecting the right materials to following the correct application techniques, every detail matters. Understanding the ideal waterproof height and the step-by-step procedures can make a big difference in the effectiveness of the project. So, what exactly are the standards for bathroom waterproofing? And how can you ensure it's done correctly?
First, Key Steps in Bathroom Waterproofing
The process involves several key steps to ensure comprehensive protection:
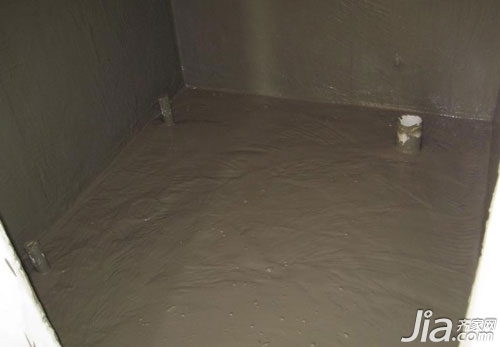
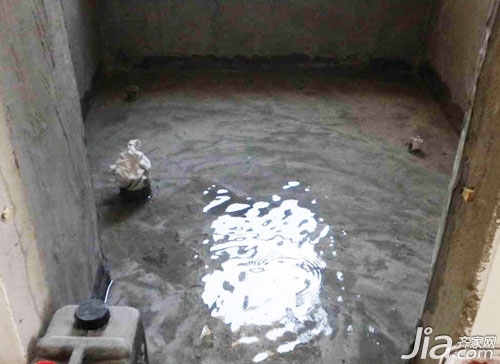
- Begin by preparing the floor surface with cement mortar, ensuring it slopes towards the drain. The slope should be gentle near the entrance and steeper near the floor drain to promote proper drainage.
- Focus on sealing the areas around pipes and floor drains. Apply a sealant at the pipe roots, smooth it with cement, and then apply waterproof coating. Reinforce these areas with one or two layers of glass fiber cloth for extra strength.
- Clean and smooth the wall surfaces, removing any dust or debris. Pay special attention to corners and edges where water might accumulate. Apply waterproof paint and reinforce with glass fiber cloth if necessary.
- The total thickness of the polyurethane waterproof coating should exceed 1.5 mm. Avoid relying solely on the number of coats. Start with the root areas and corners, let it dry for 4 hours, then apply the coating over the entire surface. Ensure there are no leaks or bubbles during this stage.
- Apply the waterproof layer on the walls first, then on the floor. Each subsequent coat should be applied in a direction perpendicular to the previous one. After the final coat, sprinkle coarse sand to improve adhesion with the cement mortar later on.
- Extend the waterproof layer beyond the bathroom door by 300mm on the ground and ensure it reaches 200mm above the floor level on the walls.
- Finally, conduct a 36-hour closed water test to check for any leaks or weaknesses in the waterproofing system.
The height of the waterproof layer on walls and columns should be at least 100mm above the finished floor level. In high-moisture areas like bathrooms, additional attention is needed for specific zones:
- For walls with a showerhead installed, the waterproof layer should extend up to 1800mm from the floor.
- If the wall has a concealed pipe (without a hose), the waterproof layer should cover the area up to the height of the showerhead or at least 1800mm.
- For walls adjacent to a bathtub, the waterproofing should go up to 300mm above the top edge of the tub.
- On walls next to a sink, the waterproof layer should be 300mm above the sink’s surface.
- For urinals, the waterproof layer should reach 1800mm from the floor level.
- At the base of pipes passing through the floor, including sleeves, the waterproof layer should extend 100mm above the pipe root.
In conclusion, bathroom waterproofing is a crucial aspect of any renovation. It protects both your home and the spaces below, preventing costly repairs down the line. By following the recommended practices and ensuring the correct waterproof height, you can significantly reduce the risk of water damage. Taking the time to do it right now will save you from future headaches. Make sure to pay close attention to these details during your bathroom renovation.
Bathroom Renovation, Decoration, Waterproof, Entrance, Cement, Glass Coating, Interior Decoration, Room, Glass Door, Bathroom Waterproof Practice, Toilet Waterproof, Bathroom Door, Bathroom Leakage
Metalized Texture Wood Veneer,Interior Decorative Wall Panel,Wall Panel With Special Design,Metal Bamboo Wall Veneer
Linyi Dongtai Decoration Materials Co., Ltd , https://www.dongtaiwood.com