In order to create a more beautiful decorative effect, many people will use large tiles, such as microcrystalline stones, when decorating the walls. These types of tiles are relatively heavy, and if they are applied in ordinary ways, they may not achieve the desired results. Therefore, many people will adopt dry hanging methods. So how much is a square meter of dry tile? What are the steps for the dry hanging of the interior tiles? In the following article, we will share these issues with you and look forward to helping friends with such needs.

How much is a square meter of dry hanging tiles?
It is estimated that many people have heard of the term dry hanging tile, but do not understand its specific construction details. The dry hanging method is generally applicable to larger-sized ceramic tiles, and the ceramic tile paved with the dry hanging method is superior to the traditional way of paving ceramic tiles in terms of effect or stability. As for how much money a square meter of dry-hanged tiles is, the fees vary from place to place. From the perspective of the city where Xiaobian is located, dry hangings cost about RMB 65 per square meter (including steel frames, dry hangings, and welding worker's fees), The fee is about 45-60 yuan per square meter. If you want to know the specific price, it is advisable to consult the local decoration master.
Dry hanging tile construction process steps explain
This is a very professional business plan. It is best to hire the most experienced local masters for construction. In order to prevent the appearance of color, affect the effect of decoration, we must first select the tile color to ensure that the same tile on the same color. Then, according to the design size and drawing requirements, the special mold is fixed on the bench drill and the stone is punched. Then brush the unsaturated resin on the back of the tile. Before the tiles were brushed for the first time, the tiles were written on the tiles, and the tiles were cleaned of dust and dirt.
Dry hanging tile construction process step two
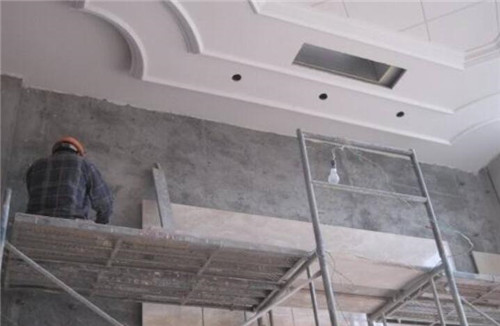
After everyone has processed the tiles, they will then have to deal with the walls. For the flatness of the wall, everyone should first perform the necessary cleaning of the wall, then the position of the skeleton should be elasticized to the main structure, and the line-releasing work should be performed according to the axis and the elevation point. The verticality was controlled using a theodolite, and the horizontal line was measured with a water level meter and marked on the wall and the beam. On the wall, the position of the vertical channel steel is first ejected, and the fixing point of the vertical main keel is determined. After the arrangement of the vertical channel steel is completed, the horizontal angle steel position is projected on the vertical channel steel. Skeleton construction focuses on the welding quality and welding deformation of the main keel and wall embedded parts, and the construction method without embedded parts. The owners, supervisors, and quality supervision stations will conduct covert inspections.

Dry hanging tile construction process steps three
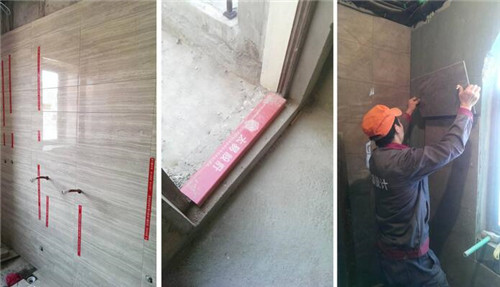
When you are ready to work, the next step is to install a wall tile. Everyone should take the line first and lift the vertical line from both ends of the wall, from the top to the bottom, with the spot on the ground or at a fixed point. When looking for vertical, it is generally based on the reference of the back of the board and the initial layer of the base to hang the board. The vertical and horizontal vertical ink lines are ejected according to the size of the board and the width of the gap on the facade of the base. Then install the tile bottom plate, first install the bottom tile according to the position of the stainless steel anchor fixed on the wall. Position the tile back plate and the anchor fixing pin in alignment, and then use the rectangular bolt holes on the anchor to adjust the flatness, verticality, and crevices of the tile. The anchors are then used to secure the tiles and the anchors are jammed and fixed with anchoring glue. The best step is to install an ascending plate, first inject the embedding glue into the slot of the back plate of the next row of plates, wipe the residual glue, and then place the tile in the previous row in accordance with the method of installing the bottom plate. The jade wrench checks the installation quality and is fixed after meeting the design and specification requirements.
Dry hanging tile construction process detailed four
After the completion of the construction, in order to ensure the final results, everyone needs to check the construction. The acceptance and acceptance can be carried out according to the following standards and methods:
1, check the number: According to a representative natural area random check 10%.
2. The type, size, color and pattern of the tiles must meet the design requirements.
3, tile installation must be solid, no skew, missing edges and cracks and other defects.
4, tile surface smooth, clean, color coordination, no discoloration, pan-alkali, stains and significant gloss damage.
5, tile joints should be embedded dense, straight, uniform width, uniform color. The direction of board splicing at the corners of the yin and yang is correct, and non-whole bricks are suitable for use.
6. The tiles around the protrusions are cut and aligned with the entire brick cover. The edges are neat and the thickness of the protruding wall is the same.
The above is about how much money a square meter of dry-hanged tiles and dry-hanging tile construction process steps are related to share, to give you a reference! If you have more related issues, welcome to continue to pay attention to this site, and later will show more exciting content for everyone.
Light Powder-actuated Fastening Tool is low velocity powder actuated, single shot, .22 caliber tool which is designed for light base and concrete not harder than C40.
FEATURES & APPLICATIONS
- One tool for a wide range of applications
- Compact, sleek design – allows access to narrow spaces
- Easy to use and maintain – minimizing errors and tool downtime
- Consistent energy output over entire lifetime – delivering more reliable fastening quality
- Maximum nail length 62 mm, or 72 mm for wood-to-concrete applications
- Fastening formwork or formboard to concrete
- Fastening sill plates or trusses to concrete
- Ease to use and maintain – minimizing errors and tool downtime
- Fastening wall-ties to concrete or steel
- Fastening wire mesh (chicken mesh) to concrete
- A wide variety of applications using collated fastener
- Fastening wood and metal sheet to concrete, sand-lime block masonry or steel
- Fastening 2x4s to concrete
- Attaching drainage foils and membranes to concrete or CMU block
- Fastening perimeter wall, deflection or slip clips to concrete and steel
-
Light Powder-actuated Fastening Tool
YIBIN CITY NANXI DISTRICT QIANGXIN PLASTIC CO.,LTD. , https://www.homsetfastening.com